DIY Resin Christmas Ornaments: A Beginner’s Step-by-Step Guide
Resin Affairs is reader-supported. If you buy through links on this page, we may earn a small commission at no extra cost to you. We only link to gear we would use ourselves — prices and availability change, so check the current listing. Always follow your resin product’s label and Safety Data Sheet.
As an Amazon Associate I earn from qualifying purchases.
Introduction
Quick answer: resin Christmas ornaments are small, cheap to get wrong, and a good first project. You need resin, a silicone ornament mold or a wooden blank, color, and something to hang them with. UV resin suits thin ornaments you want finished the same day. Epoxy suits thicker ones; it is usable at about 72 hours and fully hard at about 7 days. Nitrile gloves, eye protection and fresh air apply even to a batch this small.
This guide covers the supplies, UV resin or epoxy, the steps, design ideas and the common mistakes. It also shows the ornaments I made myself, laser-cut wood snowflakes filled with epoxy, including what went wrong. Jump to my wood and resin ornaments.
🎄 Christmas countdown: when to pour
- Epoxy ornaments: pour by Sat, Dec 12. Most epoxies can be demolded in about a day but take around 7 days to reach full hardness, and you want them fully cured before they are wrapped or hung.
- UV resin ornaments: make them by Sat, Dec 19. Thin layers cure in minutes under the lamp, so these are the last-minute option. Check for any surface tack before wrapping.
- Mailing them? Pour a week earlier, and check your carrier’s holiday shipping deadlines.
What You’ll Need for Resin Christmas Ornaments
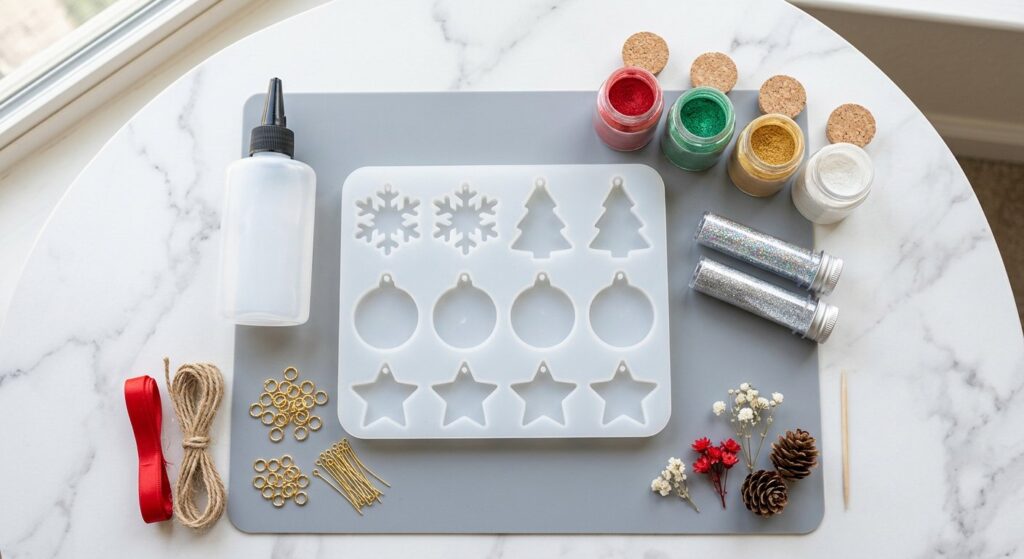
Ornaments have one of the shortest supply lists of any project on this site. If you’ve read our Essential Resin Tools guide, you likely already own most of the base kit — this list only covers what’s specific to ornaments.
One timing tip if you’re making these as gifts: ornaments need to be finished (and fully cured) before you can wrap them, so order your supplies with a buffer. If you don’t already have Amazon Prime, its free delivery can be the difference between a mold arriving in time for a weekend project and missing your gift deadline entirely.
💧 The Resin
A UV option: LET’S RESIN UV Resin, which the maker sells for small, thin pours like ornaments. I haven’t used UV resin myself, so this is a pick from the maker’s description, not a test. It sets under a UV lamp in minutes instead of days, which matters a lot when you’re trying to finish a whole batch of gifts before the holidays.
Standard 2-part epoxy works too, and it’s the better choice for a chunkier ornament (more on that below) — see our full resin comparison guide if you want to weigh every option. It is what I used for the wood and resin ornaments further down; see my Let’s Resin starter kit review.
✨ Mica Powder & Color
This mica powder set covers reds, greens, golds, and whites in one purchase — everything you need for a full range of holiday color palettes, from a classic red-and-gold bauble to a frosty white-and-silver snowflake.
If you want a more transparent, stained-glass look instead of an opaque one, alcohol inks give you that translucent, watercolor-swirl effect that works beautifully in a snowflake or geode-style ornament. Use them in epoxy only: UV resin makers generally advise against alcohol ink, which can stop a UV piece curing properly.
❄️ Molds & Inclusions
Silicone ornament molds — snowflakes, baubles, trees, and stars are all widely available — are the one ornament-specific purchase you’ll need to make; look for a multi-cavity tray so you can pour a full batch at once. When you compare molds, look for thick, glossy silicone cavities (they give a shiny finish straight out of the mold), a built-in hanging-hole post, and a shallow depth of about 1/4 inch or less so each ornament cures evenly.
For inclusions, fine glitter, dried flowers, tiny pinecones, or small metallic flakes all suspend well in a thin ornament pour — press them in gently once the resin starts to gel so they don’t sink straight to the bottom.
🔩 Findings & Tools
A few small parts turn a resin shape into a hangable ornament:
- Jump rings or eye pins, for hanging (inexpensive assorted packs cover every ornament you’ll make this season)
- Ribbon, twine, or thin ornament hooks
- A pin vise or a fine sewing pin, for placing your hanging hole (more on timing below)
- Silicone craft mat, to protect your work surface
- A toothpick, for popping bubbles and swirling color
UV Resin or Epoxy: Which One for Ornaments?
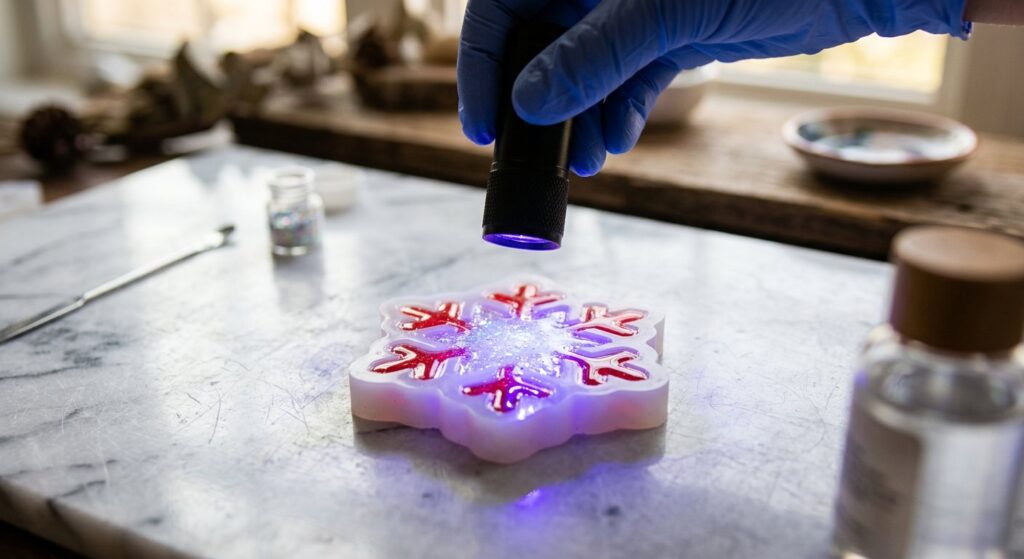
Both work — the right pick depends on how thin your ornament is and how much time you have before you need a finished batch.
Choose UV resin if: your ornament is thin (under about a quarter-inch, poured and cured in layers of about 1/16 inch (2 mm)), you want to see a finished piece the same afternoon, or you’re batching a large number of gifts and can’t wait days between pours.
Choose epoxy if: you’re pouring a chunkier ornament — a thick bauble or a layered design — where UV light can’t fully penetrate and cure the center. Epoxy’s even, all-the-way-through cure handles depth better; you’ll be waiting days instead of minutes: usable at about 72 hours, fully hard at about 7 days.
For your first batch, we’d lean UV resin — the fast turnaround means you can pour, cure, and fix mistakes in one sitting rather than finding out three days later that a bauble stayed tacky.
How to Make Resin Christmas Ornaments: Step-by-Step
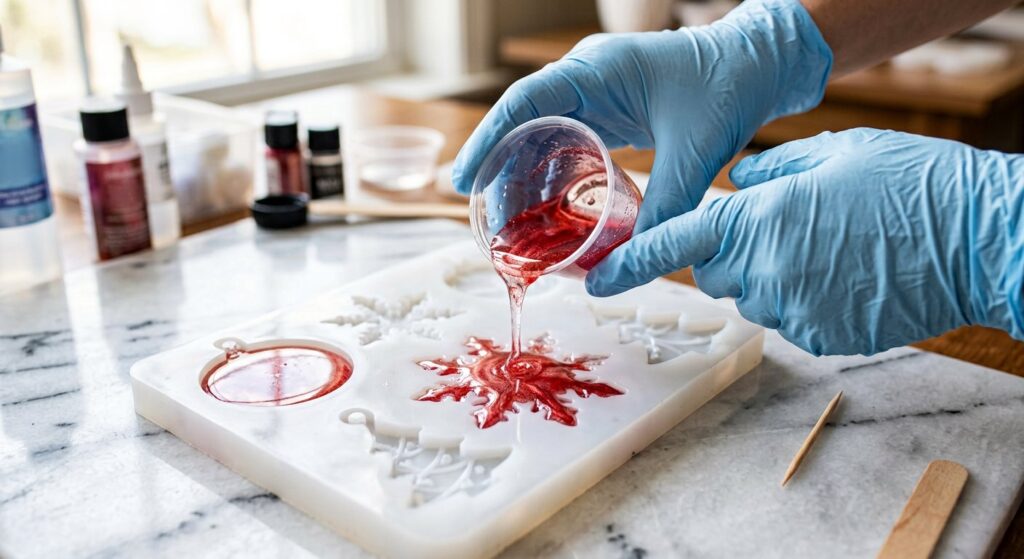
- Prep your molds. Make sure each cavity is clean, dry, and sitting on a level surface — a wobbly mold pours unevenly and can trap air along one edge.
- Mix and color your resin. Measure the way your label says, by volume or by weight, and never by eye — small batches punish measuring mistakes more than a big coaster pour does. Stir in a small pinch of mica powder (in UV resin keep it light, since heavy pigment blocks the cure, and save alcohol ink for epoxy); a little goes further than you’d expect in an ornament-sized pour.
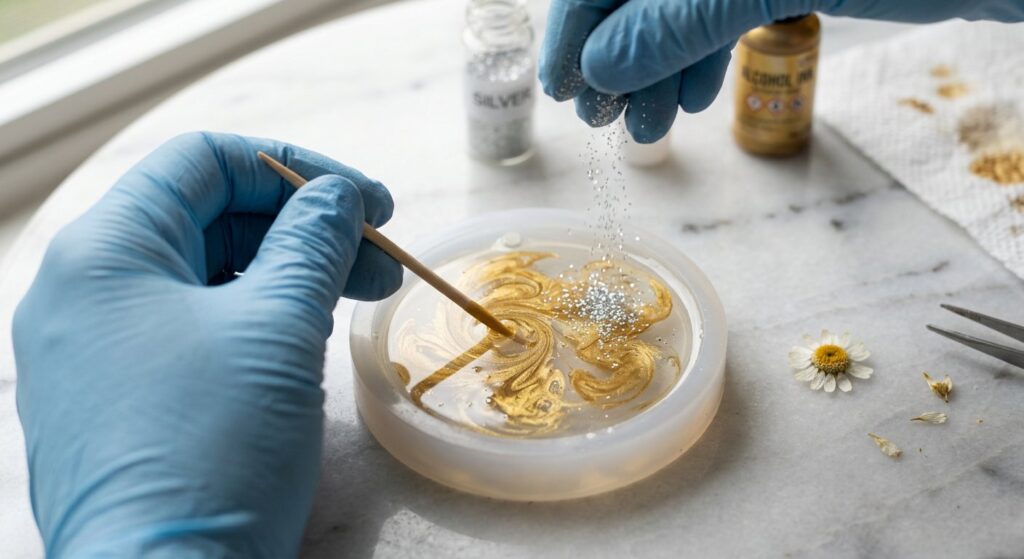
- Add your inclusions. Sprinkle in glitter, press in a dried flower, or swirl a second color with a toothpick. Do this while the resin is still fully liquid so inclusions settle where you want them, or wait until it starts to gel if you want them to stay suspended near the surface.
- Pour and de-bubble. Fill each cavity just to the rim (a slight meniscus is fine, but overfilling leaves flashing to sand), then pop any trapped bubbles with a quick pass of a heat gun or a small butane torch (see our heat gun vs. hair dryer guide if you’re deciding between tools). Hold a torch 4 to 6 inches away or a heat gun 6 to 8 inches away, keep it moving, and never use a lighter. Small, deep cavities hide bubbles more than a flat pour, so give it a second pass about a minute later.
- Cure. Under a UV lamp, thin ornaments typically cure in a few minutes — check your resin’s specific instructions for cavity depth. Epoxy ornaments are usable at about 72 hours and fully hard at about 7 days; check your resin’s label. Leave them covered and undisturbed.
- Demold. Once fully cured (not just dry on top), gently flex the silicone mold to pop each ornament free.
- Add your hanging hardware and finish. Attach a jump ring through your pre-formed hole, thread ribbon or ornament hooks, and give the piece a quick buff with a microfiber cloth.
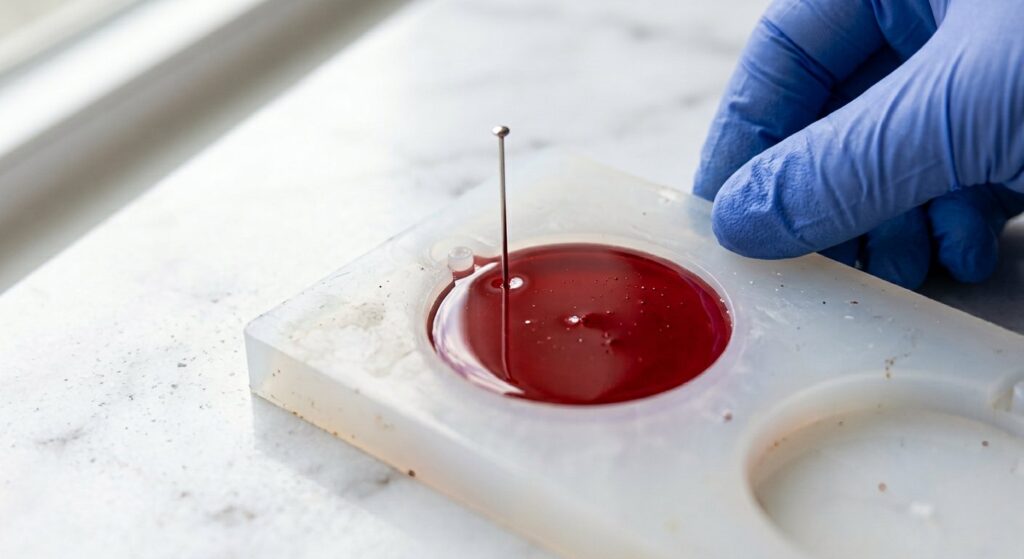
💡 Pro tip: place your hanging hole before the resin fully hardens, not after. A tacky-stage hole is the tidiest option. Once the piece reaches a tacky, semi-firm stage — a minute or two into a UV cure, or a few hours into an epoxy one — press a pin vise or a fine sewing pin through near the top edge and let the resin finish curing around it. You’ll get a clean, pre-formed hole with no risk of a last-minute crack.
Ornament Design Ideas to Try
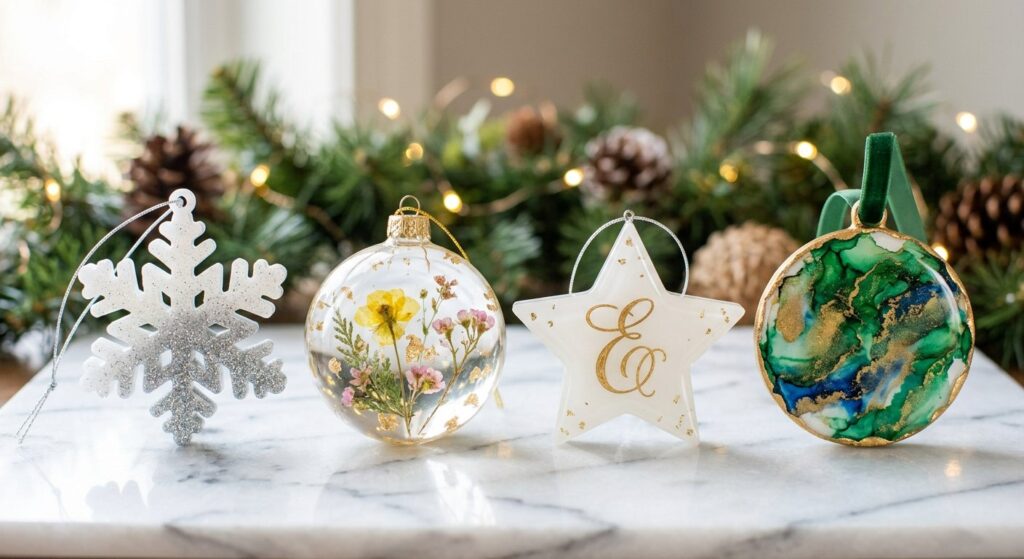
- Glitter gradient snowflake — layer clear resin with a gradient of white-to-silver glitter for a frosted look.
- Pressed-flower bauble — suspend a small dried flower or sprig of baby’s breath in a clear round ornament.
- Personalized name or initial ornament — write a name or initial in gold paint pen on a backing layer, then seal it under a clear resin pour.
- Geode-style swirl — in epoxy, use alcohol inks in two or three colors and drag a toothpick through them before they set, for a marbled, geode-like effect.
Wood and Resin Snowflake Ornaments: What Happened on My Bench
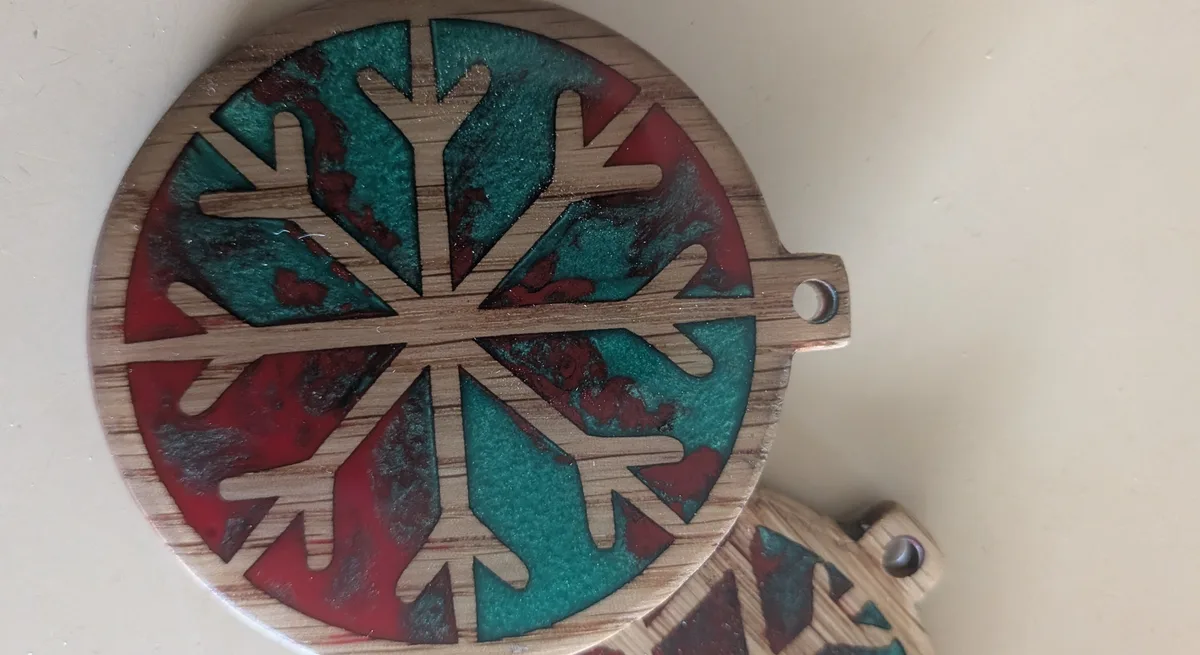
Most of this guide is about ornaments cast in silicone molds. The ones in these photos are a different build: laser-cut hardwood snowflakes about 3 inches across, with the cut-out cells filled with colored epoxy. I made three in my garage in late September 2026. Here is what happened, including the parts that went wrong.
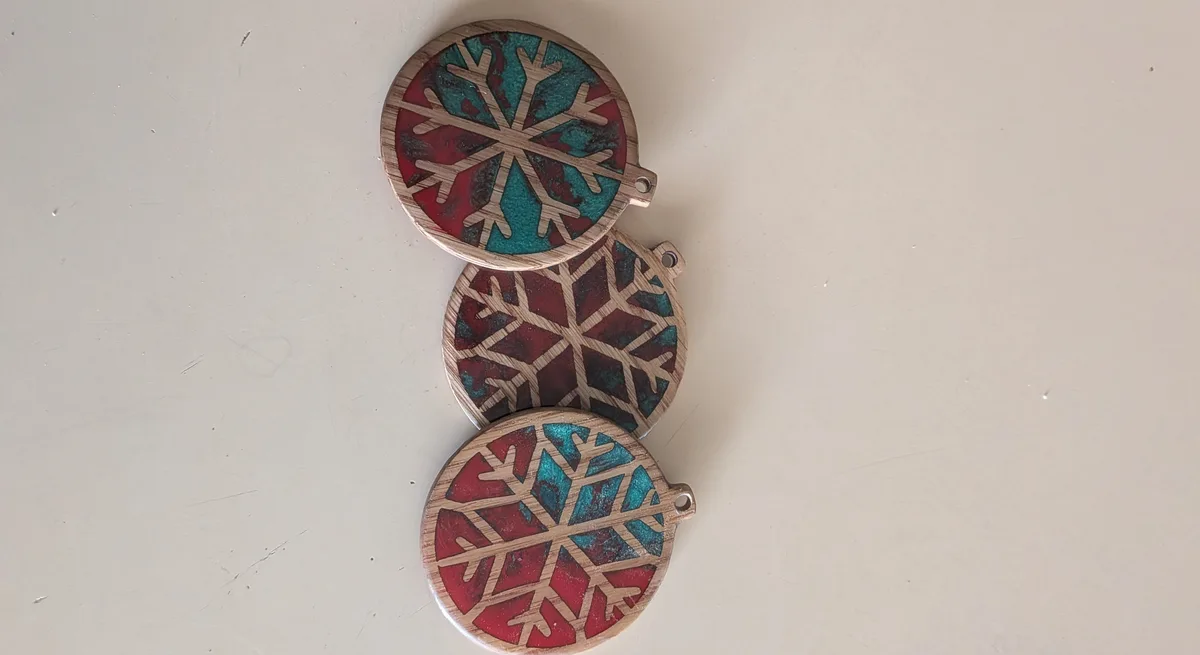
What I used
- Let’s Resin 1:1 epoxy, the kit in my Let’s Resin starter kit review: 1 oz of Part A and 1 oz of Part B (2 oz mixed) for all three ornaments. That was more than enough. A lot ran over the edges and pooled on the paper.
- Two mica powders from the kit, Watermelon Red and Bluish Green. They are fancy shades, not a plain red and green, so test a color on a scrap first.
- Nitrile gloves and eye protection for every pour.
The cure was slower than the label
Let’s Resin’s help center gives 8 to 24 hours to demold and 2 to 3 days for a full cure, at 75 to 85°F. My bench read about 71 to 75°F and the garage got colder overnight.
- At about 4 hours the resin had set, but it still took a fingerprint.
- At 26 hours it was still rubbery everywhere.
- At about 2 days it was hard enough to sand.
A slow cure is not a failed cure. Label times assume the label’s temperature. If the resin is firming up, keep the piece warm and wait before you decide it’s ruined. More in how long resin takes to cure.
Trim the overflow while it is still rubbery
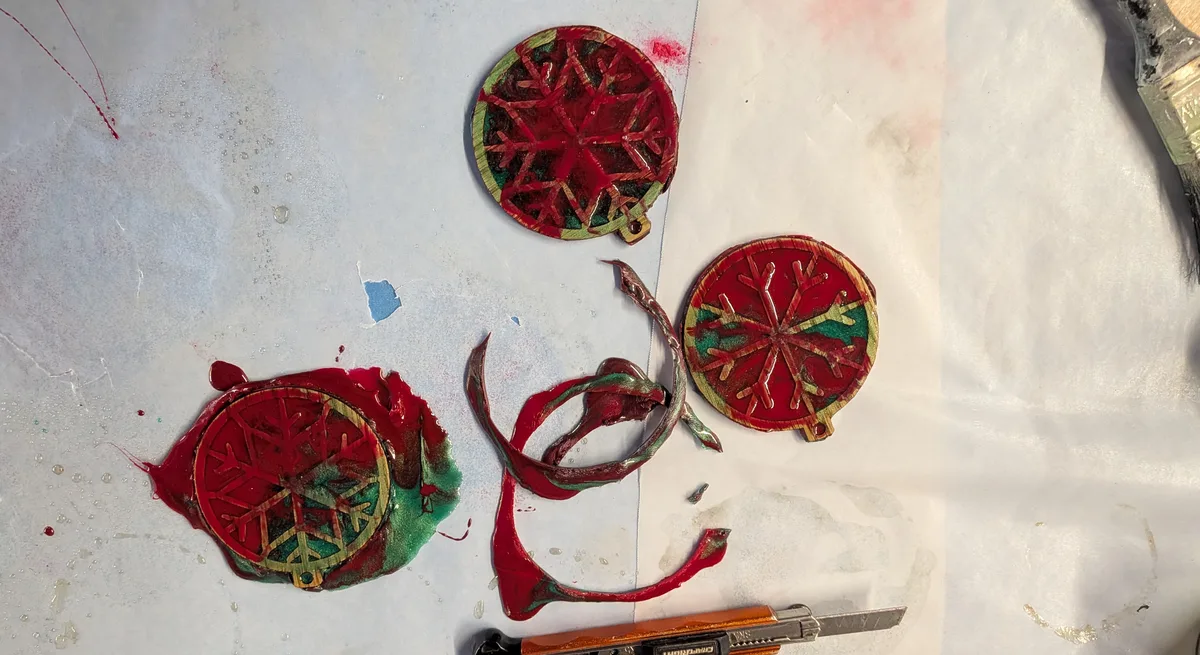
At about 20 hours I cut the runoff away with a snap-off craft knife. It came off in clean, flexible strips, which is far easier than sanding it off once it’s hard. Keep your gloves on for this: rubbery resin is not fully cured.
Pinholes after sanding
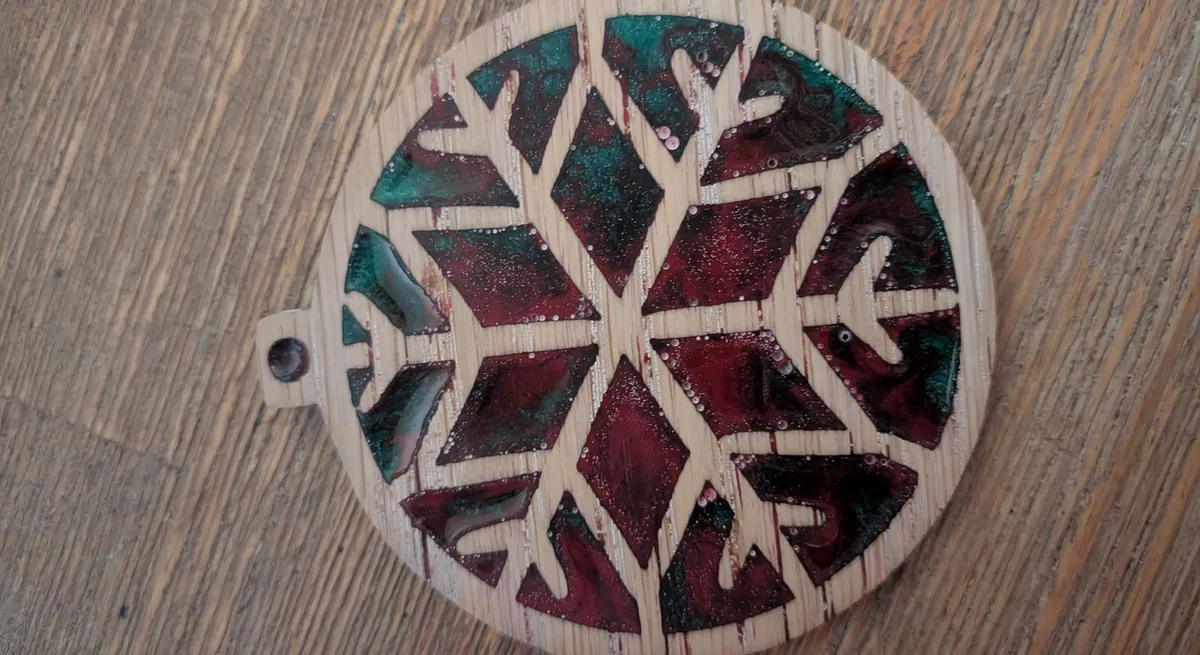
Once the resin was hard I sanded the faces flush with the wood. Sanded resin goes flat and cloudy, which is normal. What I didn’t expect was dozens of small white dots. They were bubbles sitting just under the surface. Sanding cut them open and packed them with dust.
A torch pass only pops the bubbles that are at the surface at that moment. Wood is porous, and it can release air into the resin as the resin warms during the cure. More on that in how to get bubbles out of resin. Wear an N95 mask when you sand resin, and collect the dust (how I collect sanding dust).
The fix: clean out the holes, then a clear coat
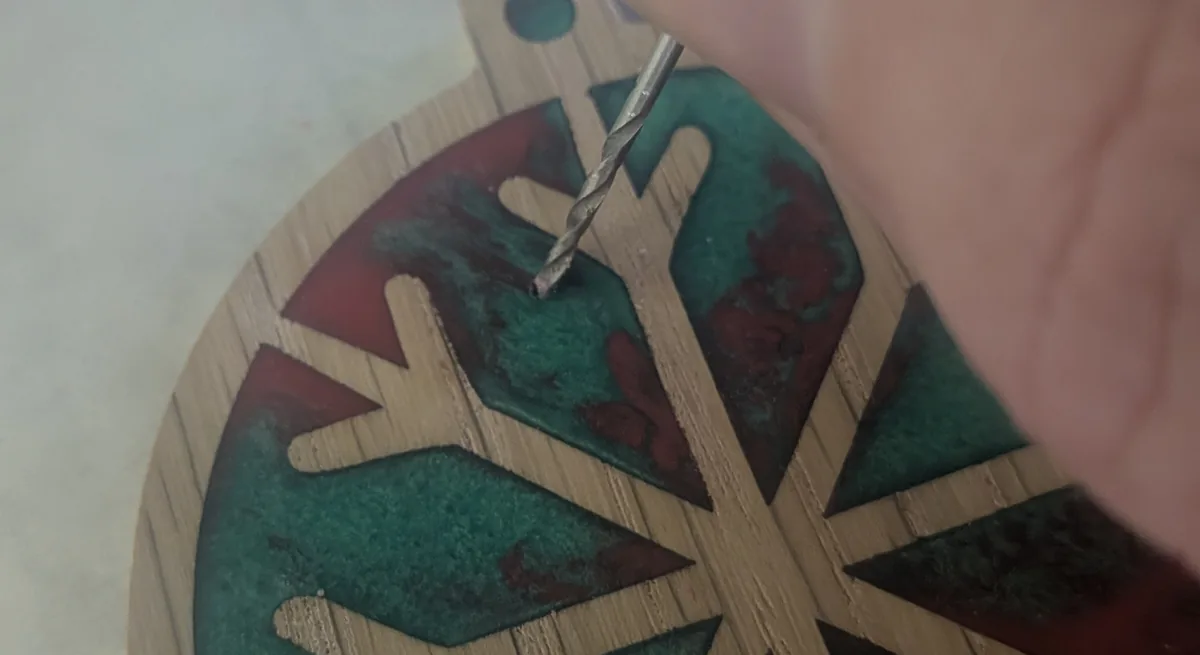
I opened each hole with a small drill bit turned between my fingers, which clears the dust and gives the resin a clean hole to fill. Then I poured one clear coat over each face, again 1 oz of each part. I didn’t fill the holes one by one. Opened up and cleaned out, they filled as the coat leveled.
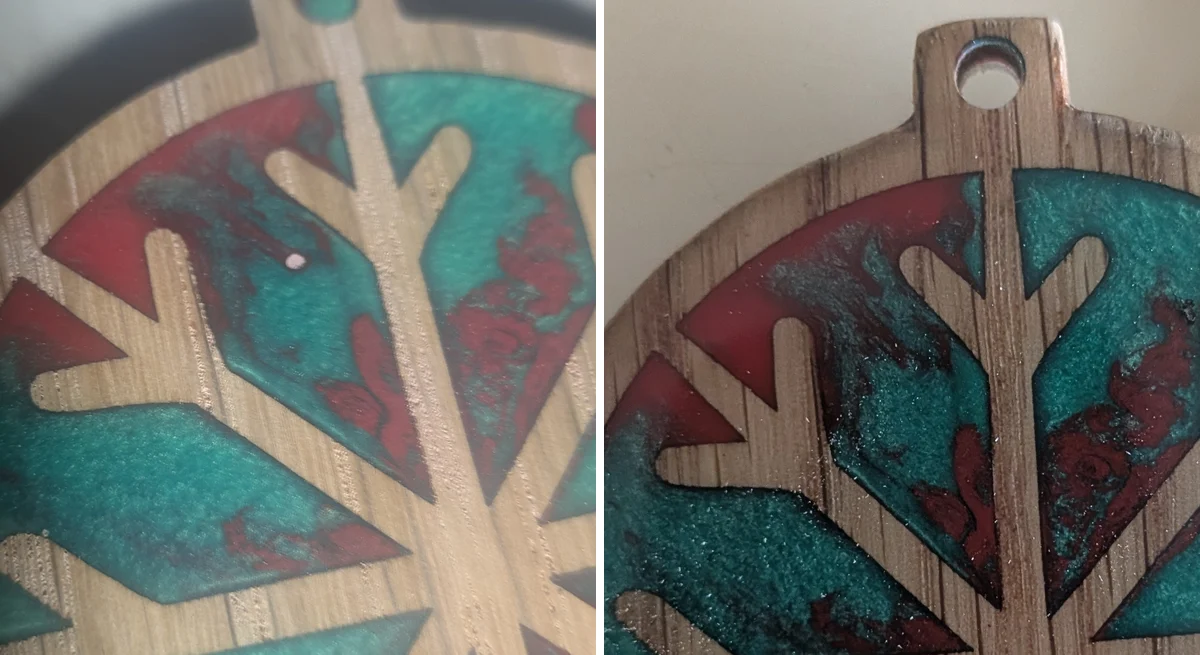
The clear coat also brought the gloss and the color back. I warmed the bench to about 85°F for the first face. That coat could still be scratched at 24 hours and was hard at 2 days.
Seal coat or not?
The usual advice is to seal bare wood with a thin coat of resin and let it cure before you pour, because a cured seal coat stops the wood releasing air into the pour. I brushed clear resin onto the wood and poured the color about 20 minutes later, without waiting for it to cure. On three ornaments this small, a separate cured coat would have used about as much resin as the pour itself, and more time. I took the pinholes instead and fixed them in the clear coat. On a bigger piece, seal first and let it cure.
Know when to stop
A small insect landed in the first clear coat while it cured. I picked it out and left the mark. Sometimes you have to know when to stop, or you could be doing fixing pours over and over and never finish a project. Cover your pieces while they cure.
Two things I’d tell a beginner
- Mix less than you think. 2 oz was too much for three small ornaments, and small amounts are hard to measure in a big cup, so use small cups and fill both parts to the same line.
- Plug the hanging holes before you pour. Mine filled with resin and had to be drilled out.
I worked out what these cost per piece, and why they don’t pay as a product.
Common Mistakes (and How to Avoid Them)
- Trapped bubbles in small, deep cavities. Ornament molds hide bubbles more than a flat coaster pour — pop them twice, once right after pouring and again about a minute later.
- Drilling a fully-cured ornament. Placing the hole while the resin is still tacky is tidiest. If you missed it, drill slowly with a small bit or pin vise once fully cured, with the piece backed by a wood block.
- Overloading a small pour with pigment. Too much mica powder or ink in an ornament-sized pour can leave it permanently tacky or cloudy — start with less color than you think you need.
- Demolding too early. A UV-cured piece can look solid on top while the center is still soft. Give it the extra minute your resin’s instructions call for, especially on a thicker bauble.
- Mold-release issues on detailed shapes. A finely detailed snowflake or star can be trickier to release cleanly than a simple round shape — flex the mold gently from the back rather than pulling at the ornament itself.
Frequently Asked Questions

Can I use leftover resin from another project for ornaments?
Yes — ornaments are a great way to use up small amounts of leftover resin from a coaster or tray pour, as long as it’s still within its working time and hasn’t started to thicken in the cup.
How durable are resin ornaments — can I ship them as gifts?
Once fully cured, resin ornaments are hard and stable enough to ship — wrap them the way you would any breakable ornament (bubble wrap, a snug box) since resin can crack under a sharp impact even though it won’t shatter like glass.
Can kids help make these?
Yes, with the right jobs. Kids can choose colors, arrange glitter or dried flowers, and help demold and add ribbons to cured pieces. Leave measuring, mixing and pouring to an adult — manufacturers generally say to keep liquid resin away from children — see our Resin PPE for Beginners guide for the basics on safe handling and ventilation, even for a small-batch project like this one.
Will resin ornaments fade or yellow on the tree?
A quality UV-stabilized resin holds its clarity well indoors. Direct, prolonged sunlight (say, in a west-facing window) can yellow any resin over time, so if you’re displaying rather than boxing them between seasons, keep them out of harsh direct light.
Sources
- Let’s Resin help center, Know More About Epoxy Resin: working time, demold time, full cure time and the temperature range for their epoxy.
- Epoxyworks (WEST SYSTEM), Tips for Clear-Finished Wood: why porous wood releases air into curing epoxy, and sealing it first.
Keep Learning on ResinAffairs.com
That covers resin Christmas ornaments from start to finish — here’s where to go next:
- 🎃 Halloween Resin Crafts for Beginners → — six small spooky projects to warm up with before the Christmas batch
- 🎁 Resin Gift Ideas for Beginners → — more handmade gift projects, a natural next read if you’re gifting this year.
- 🧪 Which Type of Resin Should You Use? → — a deeper look at resin types if you want to go beyond UV vs. epoxy.
- 🛠️ Essential Resin Tools Every Beginner Needs → — the full base toolkit behind every project on this site.
- 🩹 Common Resin Problems and How to Fix Them → — for troubleshooting stickiness, bubbles, or soft spots on any resin project, ornaments included.
- 💗 Valentine’s Resin Jewelry → — the next gifting season: heart pendants, studs and keychains made with the same small molds.
- Last-Minute Resin Gifts You Can Still Finish Before Christmas
A single afternoon and a handful of small molds is all it takes to have a tree’s worth of handmade ornaments ready to hang or gift. Go pour something small and festive.
Enjoyed this guide? Join the Resin Affairs newsletter for new tutorials, safety tips, and project ideas straight to your inbox.